
If you want to increase the phone calls amount and hot leads from Instagram profile then it would be reasonable to register a business account.
By doing this, a user gets the power of 5 (the 6th coming up) functions, allowing to:
- increase the subscribers’ activity
- boost the quantity of visits to your website
- expand the statistic of calls, requests, and sales
- realize what posts work best
- grow the subscribers figure.
This article lit the light on two questions – how to bring to life an Instagram page for business and how to extract use of all its new capabilities.
The Definition of Instagram Business Page and Its Possibilities?
The business page stands your company/personal brand page on Instagram.
It sounds obligatory for you to register the business page if you own a company selling goods/services or you are a specialist providing services.
Why creating a business page instead of a regular page is a must-have?
Here is the point. Switching your account into the business one, users can prosper on additional functions targeted to sales and clients increase.
What are these functions?
6 Functions of Instagram Business Page:
- Buttons. You will be able to place, for example, the button «Call», clicking on which the visitor could be able to contact you immediately and make an order/clarify information. There are 5 buttons a total.
- Viewing Insights. Using insights you will better understand what posts interact page visits, who are your subscribers (gender, age, geo), how many people looked the account, tapped the website link, etc.
- Posts Promotion and Advertising. Such account functionality provides users the capability of promoting posts to the narrow-focused audience by means of such targeting options like age, gender, geo, and interests. This is the coolest function for which it is worth switching to the Instagram business version.
- The Physical Address of Your Company. If your company is attached to the certain address, then show your subscribers the directions on how to get to you quickly.
- Select Category. You can specify the category. It could be a personal blog, brand, online store, etc. It helps users to understand what is the scope of your activity.
- Creating of Online Store (Still Not Available in CIS). Prices and description can be written right on the product photo on the Instagram shop. Now, this functionality is tested in the US, but in 2018 it will appear in all countries.
Instructions on How to Register Business Page on Instagram
Step 1. Create a business page on Facebook
It is impossible to shift to business account without it.
What does this page means?
Business Page is your company or brand’s page on Facebook. Do not confuse it with a personal account.
Tap an arrow and select «Create Page» in FB pop-up menu to create the page.
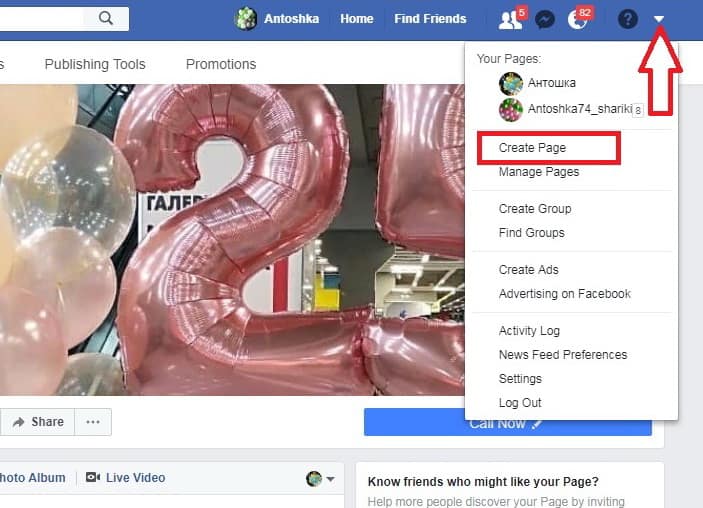
Creating the page takes 2-3 minutes (without cover photo uploading).
Important note: you must be an administrator of your FB business page. You are the admin if you have registered the page by yourself.
If your page was created by anyone else, he or she must give you an access to the administrator role.
Here is the guide on registering and adjusting the business page.
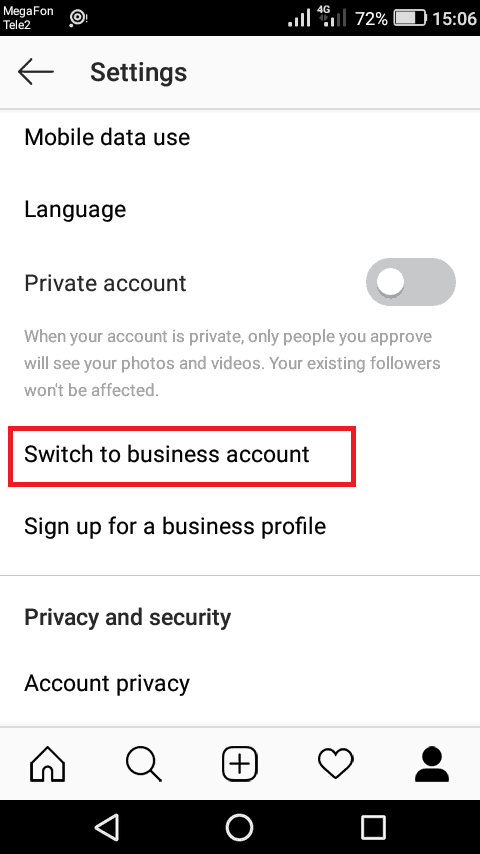
Step 2. All you need to do is to boot the mobile Instagram app, tap menu button and click «Switch to Business Account».
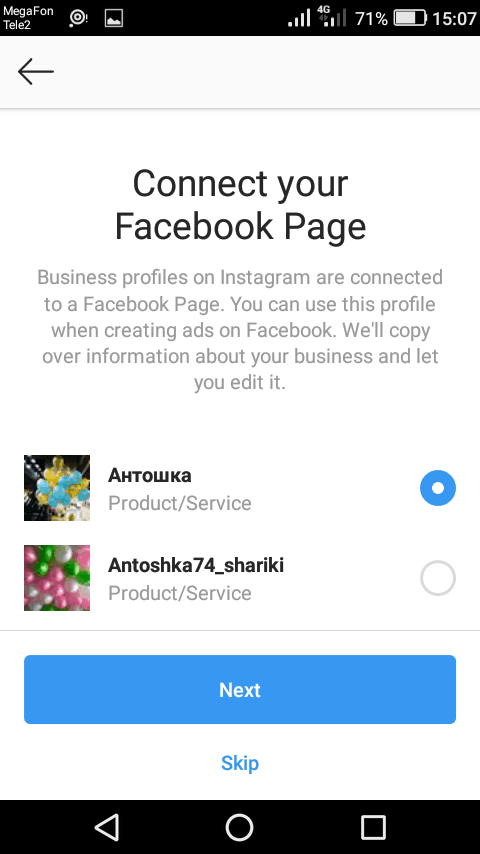
Step 3. Next, click «Continue» and «Select Page». Now you must type username and password of your Facebook account. For those having the FB app on their phones the possibility to look through accounts list is built in.
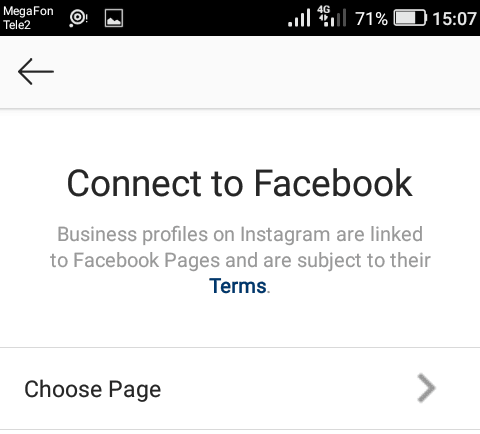
Then, you need to choose what FB page would you like to attach to your Instagram and click «Next».
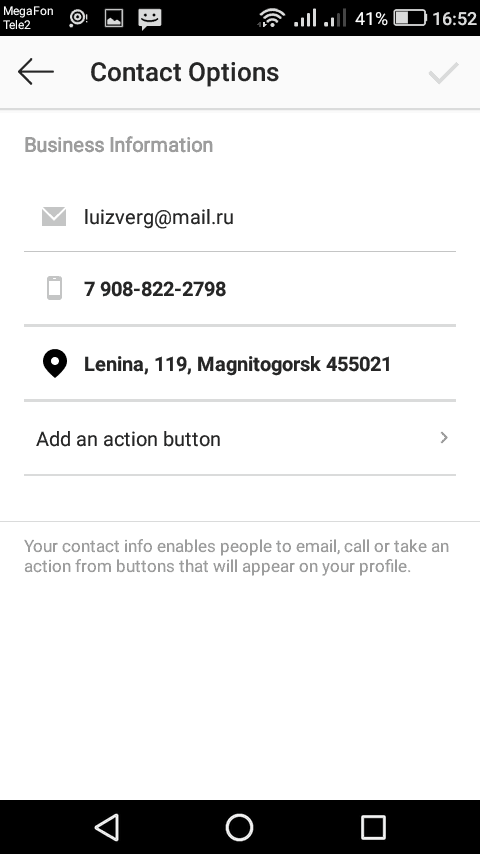
Step 4. Adjust Business Page on Instagram.
Fill in the needed data in the appeared window. Be attentive since all these data will be available to visitors of your business Instagram page.
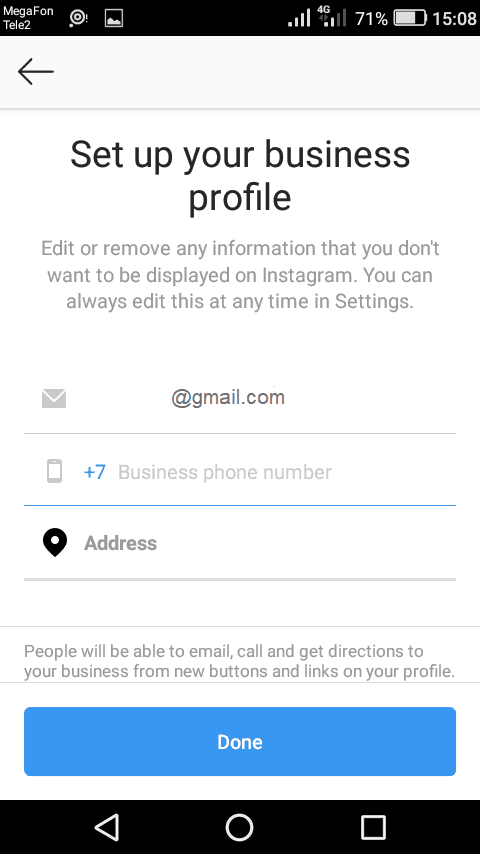
Which contacts to show?
The most deciding point should be the main target of your business page on Instagram, and on the sale process/communication with customers.
- Email and phone will suit the best if you are the owner of an online store and sell goods only
- Wish to better promote your personal brand? Set the email only
- Address and phone will be the best for local business (e.g. a cafe)
In any case, show one way minimum to get in touch with you: email or phone. Fill out the data and press the «Done» button! Congratulations! Your Instagram business account is ready.
How to Check Insights
Insights seems to be an effective tool that gives you exhaustive information on your page. You are going to obtain the full information.
Click on the button «Insights» on the menu to see it.
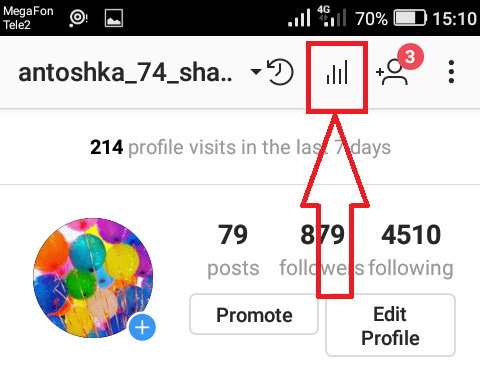
Here you can learn:
- general information about the account;
- information about subscribers;
- posts/stories statistics;
- the data on running promotions (advertising).
The important note: the insights get available to those posts only published after shifting to a business version.
At the first look, the insights gives just the general data.
The general data is the user’s weekly account stats: impressions, reach, views, website visiting.
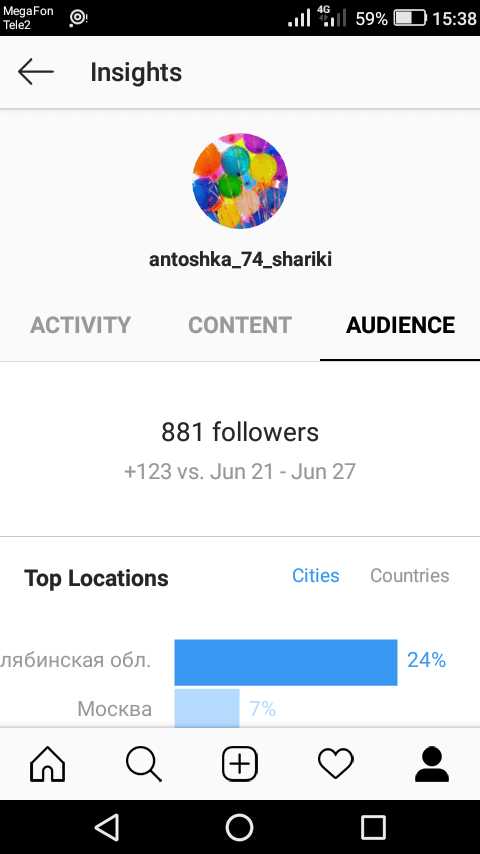
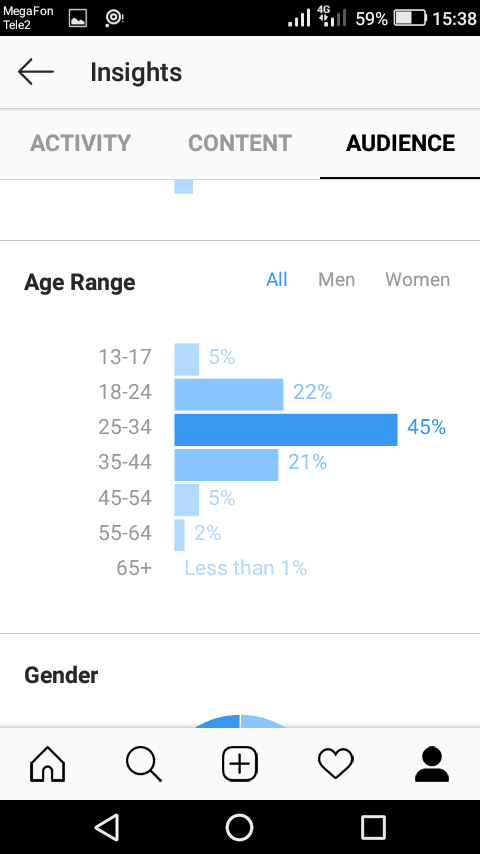
In the Audience section, you can see the information about your subscribers.
- Demographic data reveal gender and age range. This tip will help you to detect the age of those people visiting your page.
Knowing these data, you will be able to catch better the mood of your clients and create more effective content.
- The top locations are cities and countries, where visitors come from.
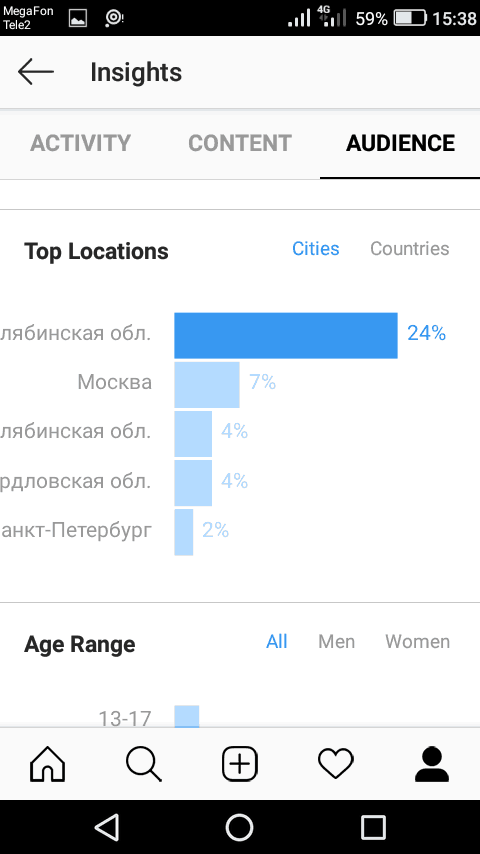
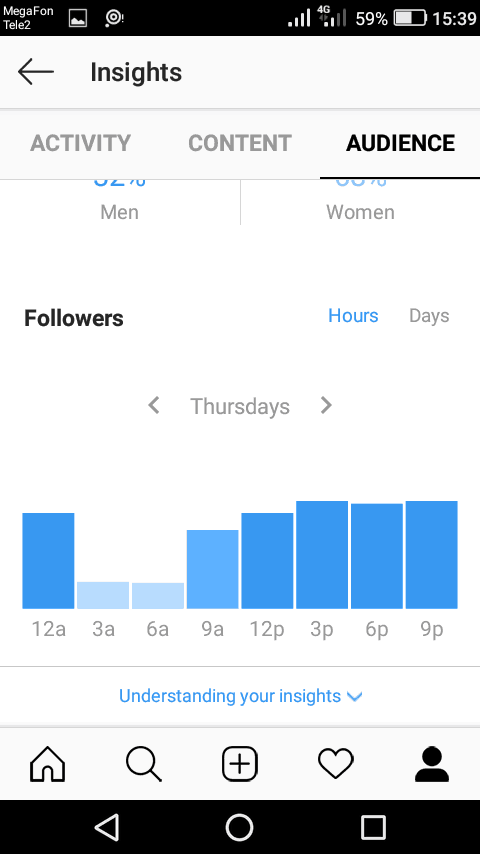
- Attendance means hours and days when subscribers come to your account most often.
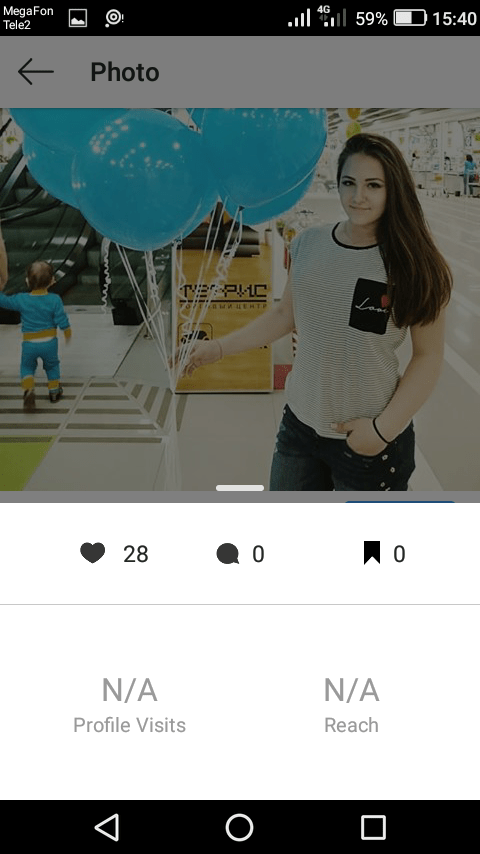
In the Posts section, you can see the data about each post separately and also sort them according to various criteria!
- The post insights reveal the audience reach, number of likes, comments, and how many times users saved it.
To see it, it is necessary to select a post and click on «View Insights».

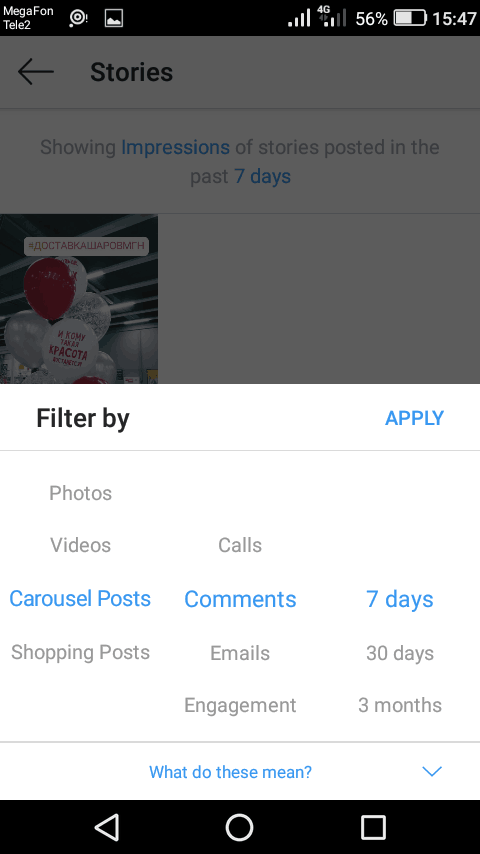
- Using filter you can make a deep analysis of your account and understand which posts work best.
For this you need to specify the following filters:
- the object of analysis: all, photos, videos, carousel posts, etc.
- the main feature: engagement, get directions, likes, comments, follows, etc.
- the period: 7 days, 30 days, 3 months, 6 months, 1 year.
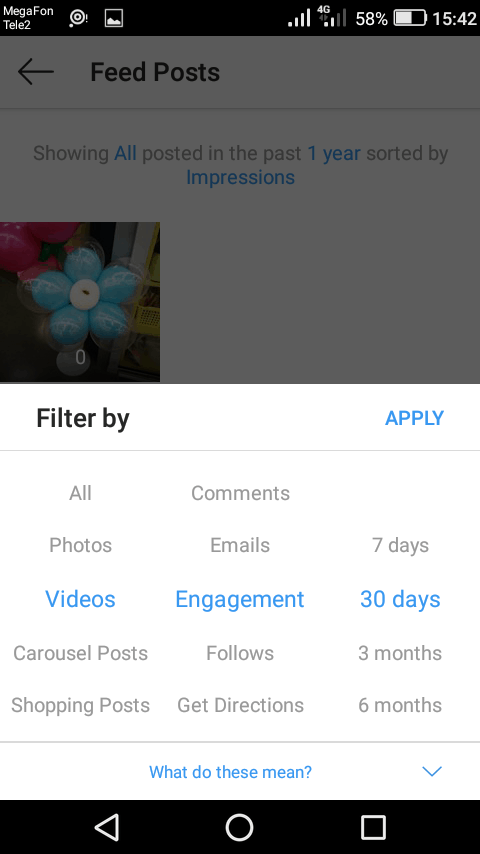
As a result, you can see what posts are commented most by your readers, to analyze their difference from other positions, and to identify common characteristics.
This information will help you to create posts that will better engage subscribers.
Stories section is similar to posts section. Here you can also sort the stories, but the criteria differ a little bit:
- the main feature: calls, comments, engagement, emails, etc.
- the period: 7 days, 30 days, 3 months.
If you will periodically review your account and see what your subscribers respond the best, then you can raise the Engagement Rate (ER), and, of course, sales!
Posts Promotion on Instagram
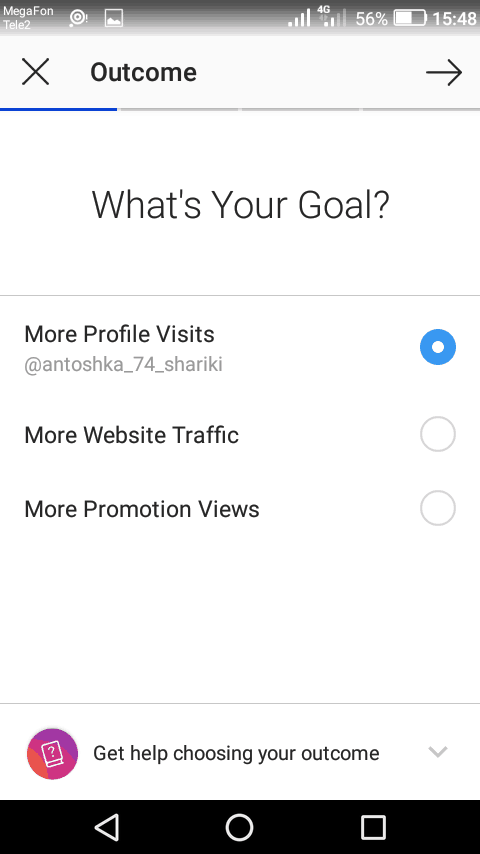
Previously users could promote posts only through the Facebook advertising campaign, now using the business version you can start post promoting via the app.
To do this, navigate to the needed post and click the button «Promote».

Next, you need to choose what this promotion outcome aims at:
- to boost visits
- to increase website traffic
- to get more promotion views.
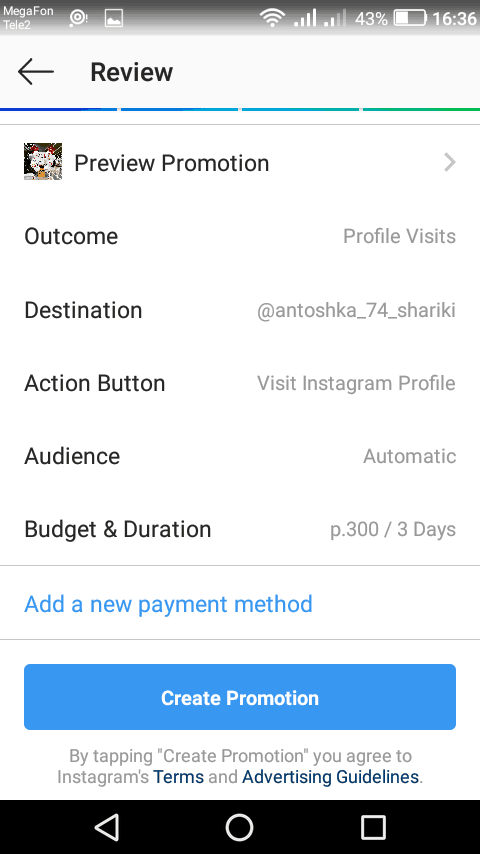
Further, specify the website, audience, budget sum, promotion period, and select a payment method (e.g., a credit card), after what the promotion campaign will go to moderation and start.
There is one more tool for increasing sales except for promotion. These are buttons.
How to Add Buttons to the Instagram Business Page
Why should you add buttons? Boosting calls, orders, sales, number of visitors, etc. – all these is possible with the help of buttons.
The buttons are located under the account description.

What buttons do we have and how they work?
5 (+1) Buttons Types in the Instagram Business Profile:
- Call. When you click on the button «Call», the user is automatically redirected to the phone dialer screen on the phone.
- Directions. Clicking on this button, a list of map applications (Google maps, etc.) installed on your phone, show. By the way, when you add the address, it appears either in buttons or in the description.
- Email. By clicking this button, the user is shown a list of email apps on his or her phone.
- Text. The click of this button opens the messenger app on the user’s phone.
- Reserve. When clicking this button, a user will be redirected to the site specified by user. For those who provide services, it is one of the most effective buttons!
- Shop. Clicking on this button opens a showcase of your products. In fact, it’s not just a button but a separate section of the account. While this feature is in beta testing and is available for a small part of the accounts only.
How to add/change buttons?
As you already know, the buttons «Call», «Directions» and «Email» are configured in the process of business account creation.
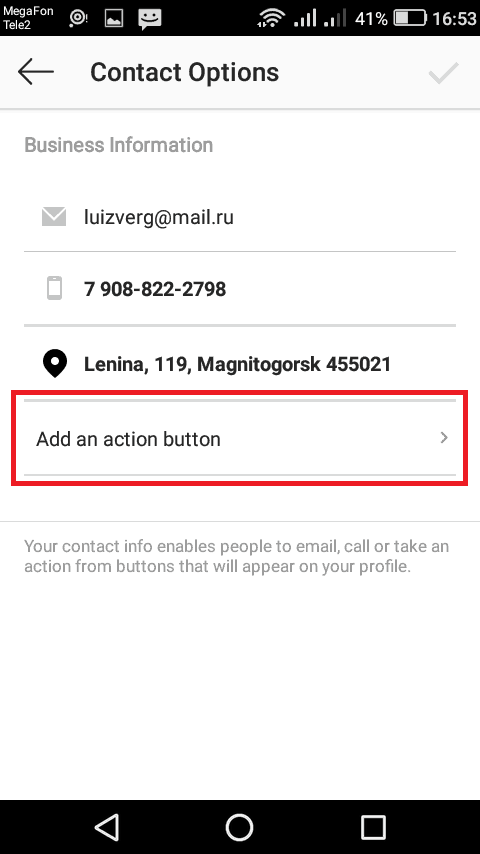
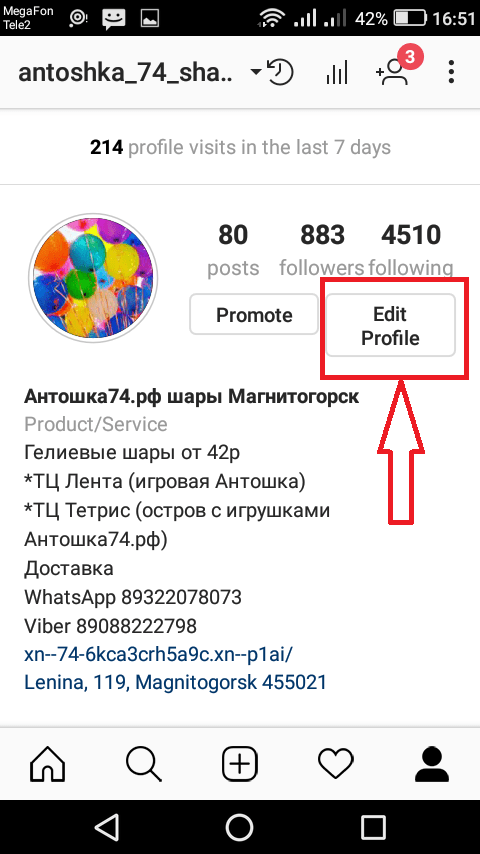
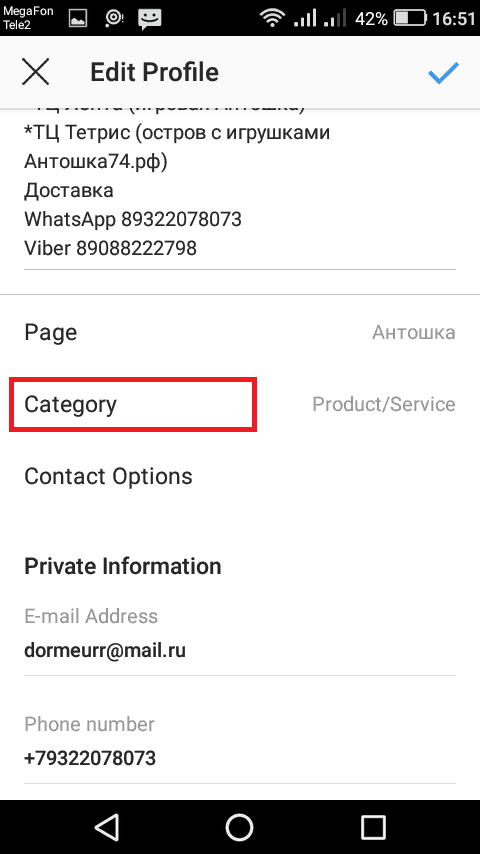
Click the «Edit profile» and select the section «Contact Options» to add other buttons, to change the current ones, or to change information (e.g., phone number).
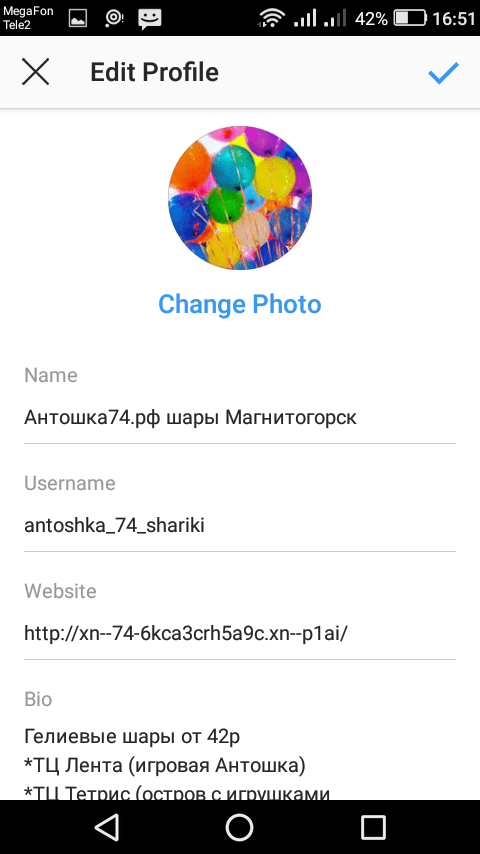
You will see 4 fields that can be edited in the window that appears. See them on photo below.
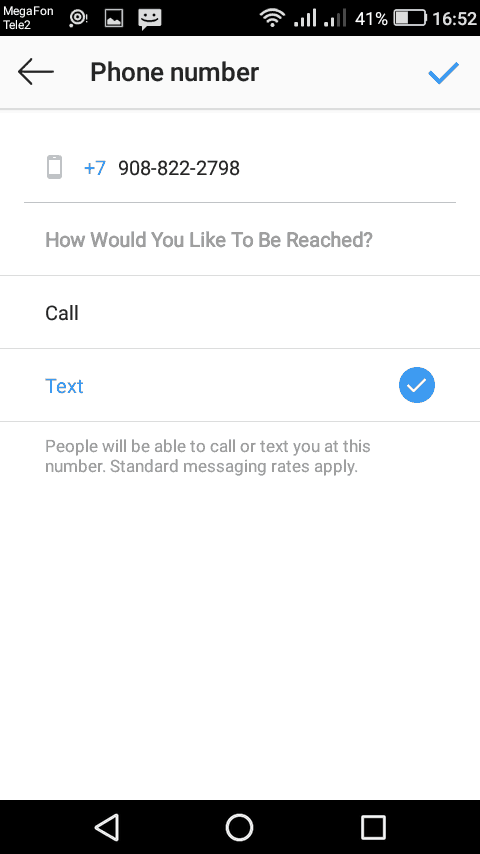
To add a button «Text», you need to tap on the phone number section, so text or call menu will pop up. These two buttons cannot be selected simultaneously.
To add a button «Reserve», you have to make active the slider next to the 4th field.
How many buttons is it possible to add?
You can add 4 buttons at the same time, but in this case, you will see only 2 buttons, and the other ones will roll on the menu (behind three dots). When you click on them, a menu appears with the other buttons.
The buttons order is set by default and should never be modified.
Important note: don’t forget to test buttons after adding them. For example, the button «Reserve» does not always work correctly.
The Shop Section in Instagram
Nowadays, this functionality is available to a limited number of accounts in the US, but in 2018 it will be available worldwide probably.
So, what is the Instagram shop and how it works?
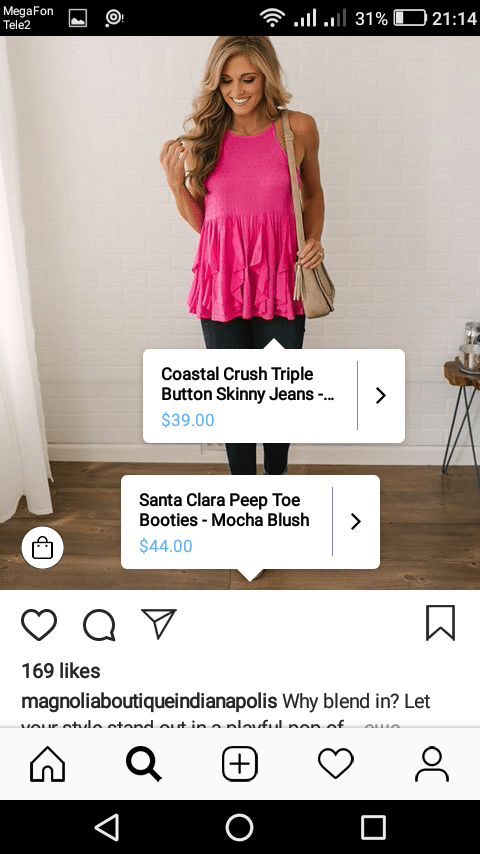
The Instagram shop is another independent section in your page full of products’ photos. If you want to go to it press «Shop» button.
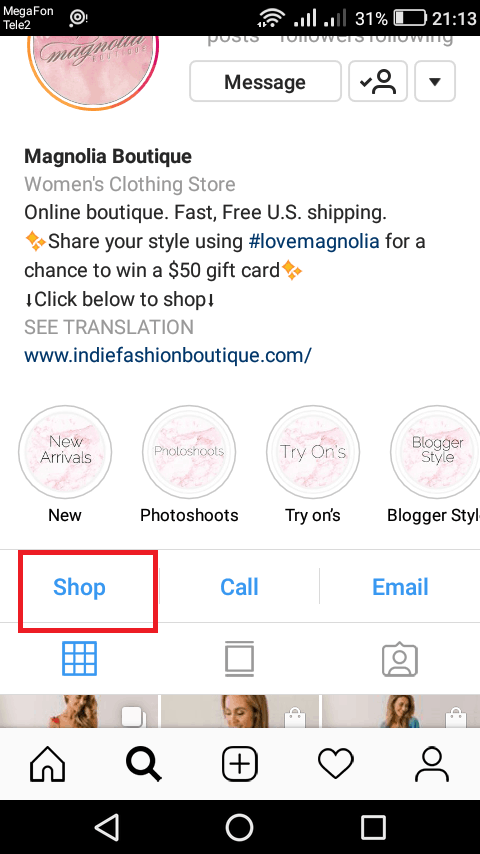
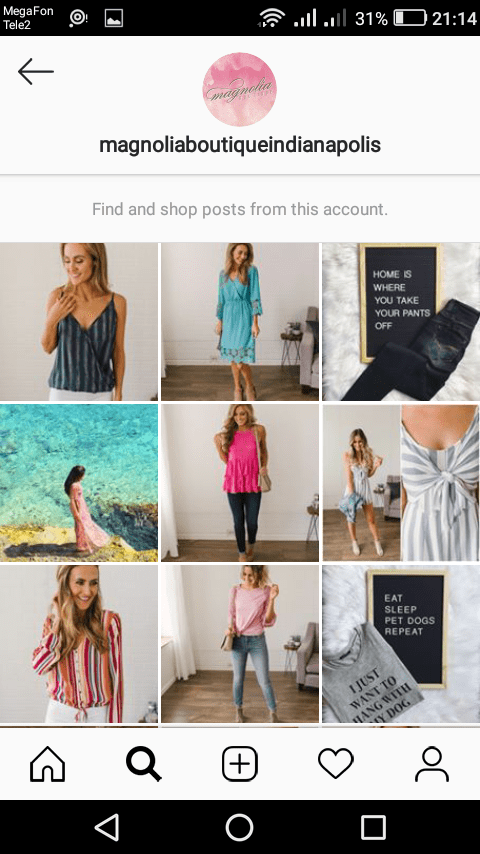
What are Shop’s peculiarities?
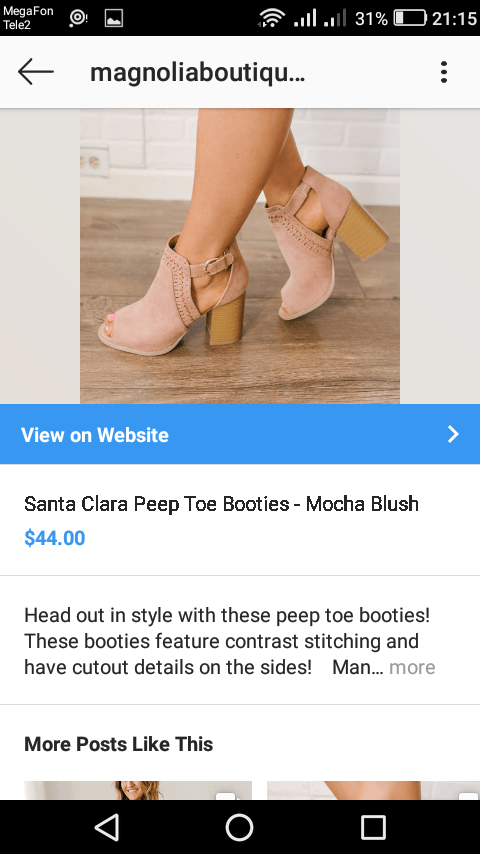
Posting a photo, you can mark it with one or more items indicating the product names and prices. These data will appear when the user clicks the photo. After that, he or she can go to a single photo (the item) with the description, price, and button «View on website», which leads to the product page on the website.
This option meets the requirements not only of online stores but any other business where you can show products or services (photographers, events planners, etc.).
What is the shop’s effectiveness rate and what we think about its functionality?
This is a very cool tool that will help to increase:
- traffic on the website;
- sales and profit.
The course of action for those having no website?
Maybe later it will be possible to add a button «Text» in the product card (instead of a button «View on website»), which will lead user in direct (similar to Facebook shop).
And the last thing that appears in business version is a category.
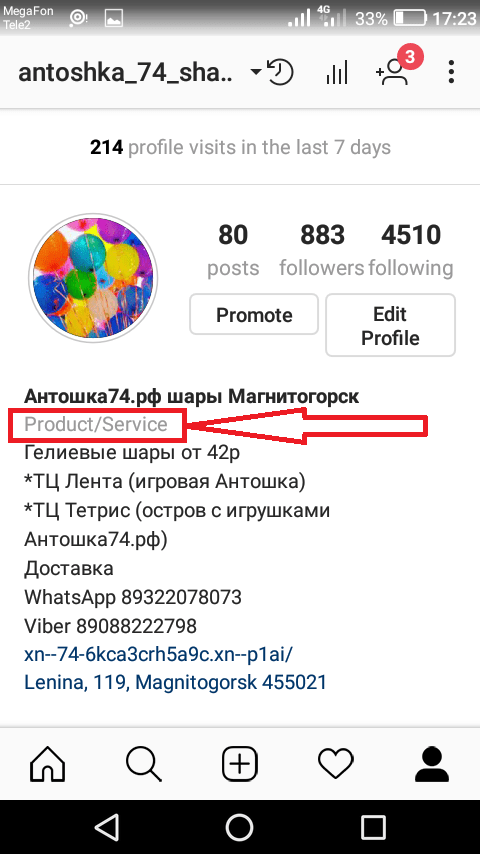
How to Choose or Change the Instagram Business Page Category?
The category is laid out right under your name. It helps people to understand the scope of your company or personal brand.
How to set it?
All users select the category of the page when working on Facebook. And after linking the page to the Instagram, it is assigned automatically.
It can be changed in 2 ways:
- To change the business page category in Facebook;
- To change the category in Instagram.
The second way is simpler.
Actions Required
Click on the «Edit Profile » button.
Go to the menu and the section «Category».
Here you need to choose the category and subcategory.
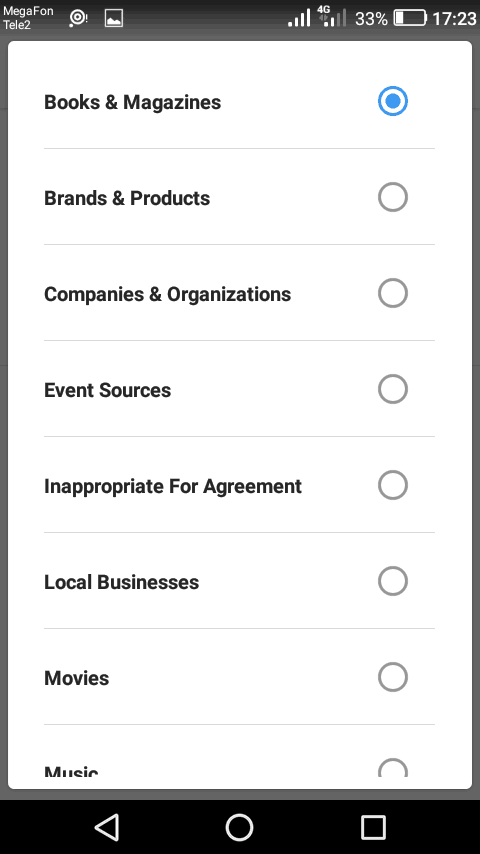
Today there are a plenty of categories on Instagram so that you could match the most appropriate for your business. Each one contains a large number of subcategories, so it is impossible to select the one that suits you in a pair of minutes.
For example, if you want to sign your Instagram as «Personal blog», then select the category «Websites & blogs» and the subcategory «Personal blog».
Conclusion
Now you know either how to register business page or how to set it correctly. You have step-by-step instructions. If you sell goods and services and use Instagram, then you must create it.
Firstly, you will get a range of functions increasing the number of clients and income with its help.
Secondly, it takes 10-15 minutes.
Do you want to get more clients?