
More than one billion people signed up, almost half of them hanging around the app on a daily basis, 80% of a total user base follows minimum one business account, 71% of US entrepreneurs claim to use this social media for business purposes – well, we can go on practically for days trying to highlight Instagram stats (you can explore on your own here, though).
There’s one thing clear off the bat with Instagram: the place is that powerful that could make your business shoot up like it’s the fourth of July. While e-Commerce and online shopping are growing deeper and wider, Instagram seems to be moving somewhere beside, and if you want to start an online shop of your own or you’ve already launched one or, say, you just have a product to promote, there’s actually nothing better than getting ahold of this land of opportunities named Instagram. You just need to get to know a few things before plunging, but, thankfully, the guide we’ve prepared won’t leave any stone unturned.
Welcome To Instagram Shopping
Imagine: you open a storefront in an extremely crowded shopping center while the customers who opt for buying from you are directed to your the front door of your shop by an invisible hand all the time. Sounds like a dream, huh? Sounds like an Instagram Shop.
In-app shopping on Instagram allows you to create listings containing your products and communicate with potential buyers within one single platform. Simply put, you can integrate listings with the Instagram profile to promote products through feed posts, Explore tab, Stories or even in a neat special shop rolling out in a dedicated tab.
That’s how shopping usually works here:
- You tag a product in an Instagram post just like you’d tag a friend.
- Then someone comes across the post with the shoppable tag.
- They tap the photo and get to see every feature to your product – additional images, prices, related products, further links, descriptions.
Availability: What Markets Are Approved For Instagram Shopping
Unfortunately, at this point of time, adding shoppable Instagram tags and delving in the world of interconnected e-Commerce is available only to a limited number of markets which go as follows: United States, Canada, Brazil, Argentina, Mexico, Peru, Uruguay, Paraguay, Ecuador, Panama, Puerto Rico, Dominican Republic, Belize, Bolivia, Costa Rica, French Guyana, Guatemala, Guyana, Martinique, Suriname, Chile, Colombia, Guadeloupe, United Kingdom, France, Germany, Italy, Spain, Sweden, Netherlands, Switzerland, Ireland, Belgium, Austria, Malta, Portugal, Poland, Greece, Cyprus, Denmark, Czech Republic, Romania, Norway, Hungary, Bulgaria, Croatia, Finland, Latvia, Lithuania, Slovenia, Luxembourg, South Africa, Reunion, Mayotte, Morocco, Estonia, Slovakia, Egypt, Israel, Turkey, Algeria, United Arab Emirates, Lebanon, Saudi Arabia, Australia, New Zealand, Korea, Japan, Singapore.
Guide To Getting Started: Laying The Instagram Groundwork
Well, it’s quite evident that Instagram has various strict requirements when it comes to their in-app shopping, yet it stands to reason because the platform seeks to create a place crammed with genuine retailers and reliable brands only. So before you start selling anything, you’ll have to go through a complex turmoil of fulfilling the requirements and adjusting things.
Here’s what Instagram Shopping wants from you:
- Location. Whoopsie, but unless your business is located in one of the countries mentioned above, you’re not eligible to join Instagram as a seller. However, note that Instagram Shopping is being upgraded and updated consistently, so you might want to look your country up here from time to time because it can get added to the list.
- There for business. If you’ve been using Instagram as a regular user, you need to switch to an Instagram business profile since all these shopping features won’t be available to you otherwise.
- Follow the policy. Look over Instagram commerce policies and merchant agreement to make sure your future shop doesn’t violate any local law. Besides, get your bearings in Instagram list of prohibited products to avoid probable problems with selling ‘illegal’ items.
- Bring in Facebook. The trickiest part here is that to start a shop you fist need a Facebook shop because Instagram doesn’t offer sophisticated tools to stock digital shelves but rather extracts the information from an existing shop to simplify the process.
Dealing With Facebook Shops
So, in order to move on, you need to deal with your Facebook shop first. If you happen to run one already, procced to the next chapter, but most likely that you haven’t taken care of the thing. Basically, it’s not a major issue to ‘make’ a shop there, and you even have two options to choose from:
- Get a standalone shop taking payments on Facebook and allowing to manage orders directly (not exceptionally good in terms of time and effort involved).
- Synchronize your e-Commerce site to the Facebook page to take a shortcut.
STANDALONE SHOP
Even though the option is not recommended due to obvious reasons connected to crude management features, if you don’t have a website yet, that’s the only ticket to the show.
Step 1. Set Up A Shop
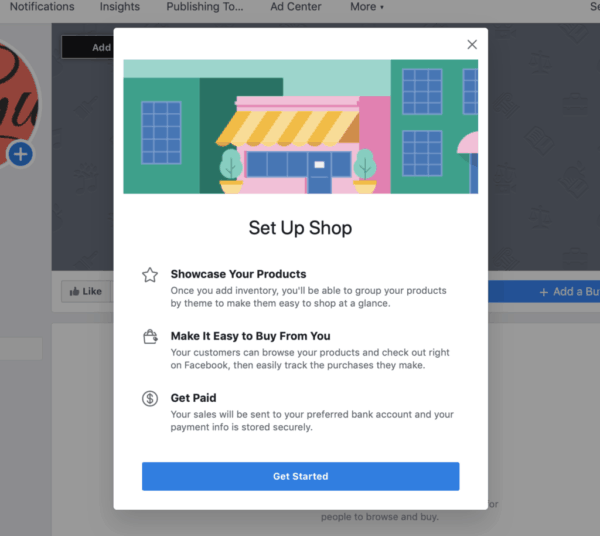
1. Go to your Facebook business page and select the ‘Shop’ tab that will reveal a pop-up window offering to walk you through the process. Click ‘Get Started’.
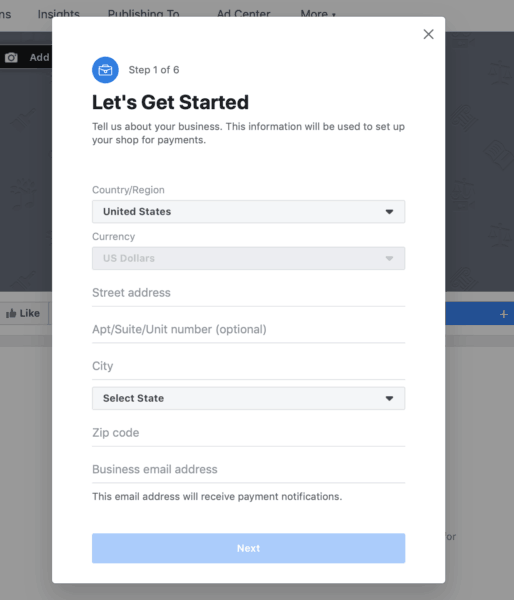
2. Fill out an information form, provide business details. Then click ‘Next’.
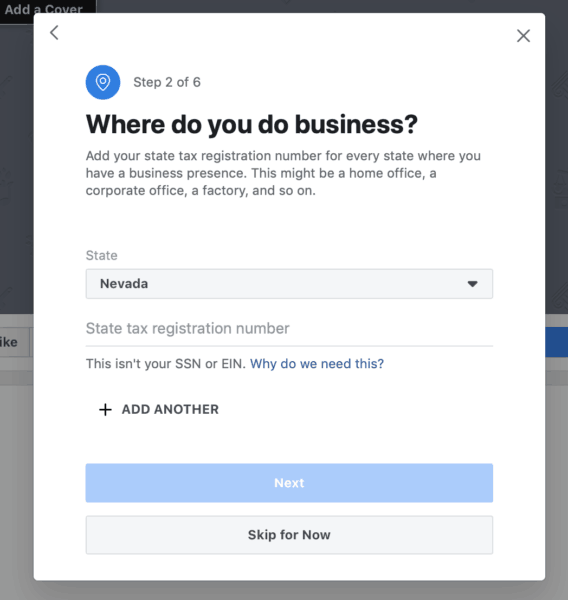
3. The pop-up after that asks you for your tax registration number. If you have a couple of them, click ‘Add Another’. Note that the step is optional, you can easily return to tax businesses later on.
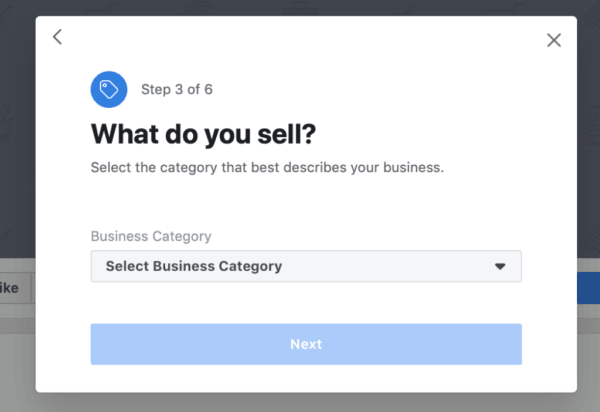
4. Then select a category for your business by indicating the type of products you’re planning to sell in a shop.
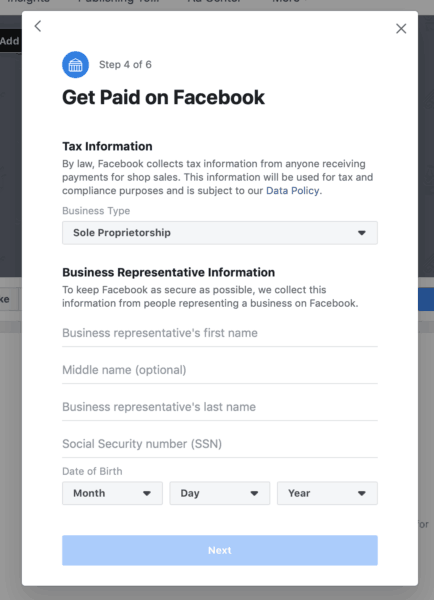
5. Another tax-related pop-up will ask you to type in the info on your business representative.
Step 2. Add Products To The Shop
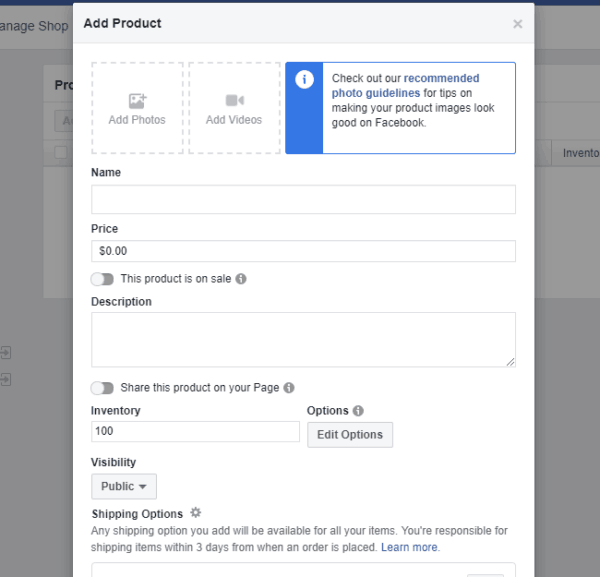
Return to the shop page and hit ‘Add Products’. You will see a straightforward form where you need to map out all the details concerning the products.
- Come up with names and descriptions – you can always copy-paste the data from your e-Commerce shop if you have one.
- Set a price and don’t forget to switch products visibility to ‘Public’.
- If you feel like promoting the Facebook shop, go on with filling out a listing – add nice photos, select shopping options, set inventory.
INTEGRATED SHOP
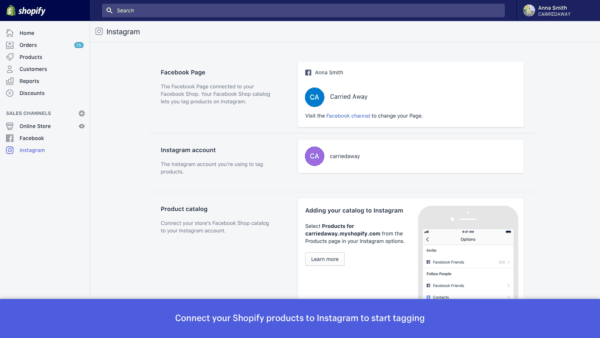
If you use an e-Commerce solution like Shopify, you don’t need to battle your way through endless manual listings, but sync your entire shopping catalogue with Facebook in a few easy clicks. This awesome Shopify plugin can help you effortlessly integrate the whole heap of pages with one another. However, 99 out of 100 e-Commerce platforms would provide you with respective tools, so just check out the settings if you want to go integrated.
A Few More Important Steps
Now, you need to make sure everything is set and done before you move on to the part with shopping tags and getting it real.
- Update Instagram application. First off, make sure you use the latest version of Instagram because oldies might not support the shop feature. If you’re alright, you should see little bags icons right on shoppable posts. If you don’t see any, it means your Instagram app is out-of-date – head to the app store and get it settled.
- Link accounts. Right after you’ve done all this amazing work with setting up a Facebook shop, you’ll need to link it to the Instagram page – go to Instagram’s settings, choose ‘Linked Accounts’.
Tick-Tock: Wait For An Approval
After you link a product catalogue to your page, your Instagram account will be automatically sent to a checkup by the system in order to verify the shop is eligible to enter the Instagram Shopping airspace. Don’t panic if it’s been two or three days but nothing happens to your shop status – Instagram informs that the approval process may take a little longer than that. As soon as you get approved, you’ll be shown the following notification:

Start Tagging
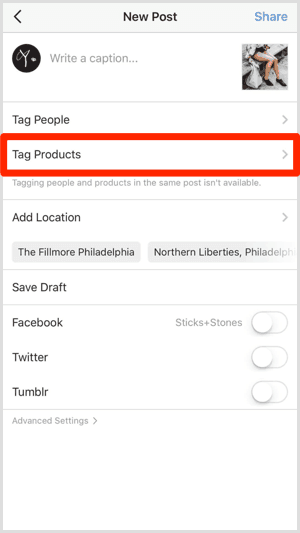
Finally, you can get down to some real deal and start tagging your products throughout different sections of Instagram. When you create a new post, there’ll be a new box with ‘Tag Products’ where you can include products information and therefore promote your shop.
Instagram doesn’t allow to abuse shoppable features that much – you can tag up to 5 products per picture or up to 20 ones per posts with a few pictures attached. However, right when you tag any image, a new tab will be displayed below your profile welcoming passersby to rummage through your Instagram catalogues. If you want to tag Stories, use ‘Product’ stickers – note that you won’t be able to edit published Stories, so if you add something wrong or forget to attach a tag, delete the post and re-upload it to Instagram.
4 Tips To Convert Instagram Shopping Tags Into Real Sales
Tip #1: Create An Instagram Aesthetic
If you’ve been around Instagram for a while, you’ve probably noticed multiple times that business profiles try to make their posts cohesive and in-line to reflect the voice of the brand and stand out against the Instagram competition. That’s exactly what you want to do to generate more sales and attract more customers to the page. Make sure you stick to a strategy: apply the same editing tone throughout all the Instagram posts. Choose colors and Instagram filters of your own.
Tip #2: Keep Tabs On Instagram Insights
In-built analytics systems track tons of quality info about your page, posts, followers and progress for absolutely free, so make sure to take advantage of this gem. For example, you may test some photo with a certain tag and figure out whether it clings with your Instagram audience or not. Instagram Insights is a great source of valuable information.
Tip #3: Work With Hashtags
One rule: be specific and descriptive as possible. Basic SEO would do good to your posts visibility in the news feed, and more visibility means more clients in the end. Having Instagram hashtags sorted gives you an excellent opportunity to draw potential customers. Besides, you can interlink your hashtag strategy with Instagram Insights to watch the effectiveness of a particular hashtag.
Tip #4: Two In One And One In Two
Remember that you can tag up to five products per image, but remember that a standard phone screen has a limited amount of space, and you don’t want your customers to get lost in the maze of multitudinous Instagram tags. On the other hand, some novices to Instagram Shopping are afraid of overlapping the information on the tags so much that they don’t add more than one tag per picture. You shouldn’t go either way.
If you’re looking for ways to boost your Instagram account and draw a large audience but you have no faintest idea where it’s better to start, you should check out these useful Instagram tips that will help you to improve faster.